Sunday, March 30, 2014

Leg of lamb

I like lamb. I prefer the Australian and New Zealand variety, as they tend to be grass fed, and they are less fatty than the American or Canadian lamb we have tried.

This is a short note on making lamb sous-vide, simply because what just came out of the plastic bag was too good to forget how exactly I made it.

I got a boneless butterflied leg of lamb, about 5lb or so. I always take the time and trim it - take off the outer layer of fat, and I also cut away as much of the internal fat as I can, definitely all the large chunks. This too, at least in my experience, not only reduces the amount of saturated fat one consumes, but also reduces the gamy taste.

Once the lamb is cleaned, it appears like a large collection of chunks that are barely held together. Take advantage of the many surfaces of the meat being exposed, and season it. This this time I used salt, pepper, garlic powder, onion powder, rosemary powder, oregano powder. Also good is a combination of ground cumin, chili powder, e.g. korean chili, or ancho chili, or New Mexico chili, and always garlic. You can also smear crushed garlic all over the meat.

I season the meat quite liberally.

For easier handling, and later cutting, I tie the meat together using butcher's twine. YouTube is your friend is you want to learn how to tie a piece of meat straight from LeCordon Bleu.

The meat goes in a plastic bag. Add a chunk of coconut oil, or some olive oil. Vacuum seal with manual pulsing so that the oil is not pumped from the bag, clogging your vacuum pump.

Cook in a 140F bath for 8-9 hours. I tried different time/temperature combos, and this one works best for my taste. The result is a beautiful medium-rare to medium lamb that is very tender but not mushy. Dry the lamb with a paper towel, and torch it to sear the outside. If you don't have the torch, sear the lamb quickly in a hot heavy skillet.

I like to serve this with horseradish sauce: Take a 1.5 inch chunk of horseradish root, clean the dirt away, peel the skin, and grate it on a fine microplane grater. You may find yourself crying while you grate, and that is OK, the horseradish is helping you remove stress hormones and other things from your body. I grate horseradish straight into a bowl, and then place the bowl for about 10-15 minutes outside, on the fresh air. That will remove lots of harshness. You can also stir 1TB of lemon juice into the horseradish to slow dow the oxidation.

Just before serving, mix a few TBs of sour cream and a small pinch of salt with the horseradish. You just made creamed horseradish. I like to add a touch of lemon if I didn't add the lemon before venting the horseradish.

Slice the lamb, serve it with a dollop of the creamed horseradish and a slice of crusty bread. Or use whatever other combo you desire. Here is a simple appetizer-style presentation.


If you have leftovers and you'd like to freeze the lamb, I recommend creating lamb goulash. Let's leave that for another post!

Sunday, March 2, 2014

Torch versus pork tenderloin

Pork tenderloin is an annoying cut of meat. Very annoying. It is supposed to be simply delicious. Yet it has a tapered shape, so it doesn't cook evenly. If you make it into medallions, they are so very easy to overcook and dry out. You can butterfly it, pound it out, make a roll, and roast. And again chances are it will turn out dry and stringy.

In other words, pork tenderloin is a challenging piece of meat to cook. When you are in a hurry, or when you have a time, making it well requires skill and practice. I admit that I pretty much gave up it. Much embarrassing for someone who pretty much grew up on pork and potatoes.

Every pig has two tenderloins only, so the cut is precious. Years ago, I was very surprised to see the large numbers of tenderloins available in the stores. So I googled "number of pigs slaughtered per year" and learned that the US alone processes more than 120 million pigs. That is one pig per about three people in the US. Or 240 million tenderloins, which means almost one per person in the US. We better learn how to tame that beast of a cut.

A simple sous vide setup
In waltzes the sous vide circulator. The circulator is, in principle, a surprisingly simple device. It consists of a heater and a small propeller that moves the water around. And a thermometer and a fancy logic device that makes the circulator actually work. The goal is to cook the food at a very precise temperature that is much lower than the temperature of your skillet or the temperature of your oven. It also turns out that a few degrees make a big difference in the texture of the meat you are cooking. If you are curious, the Modernist Cuisine web site has a nice article on why sous vide reigns supreme.

When you cook sous vide, the food goes into a plastic pouch. So, I trimmed the tenderloin to remove the tough silver lining from the surface, seasoned it with salt, pepper, the ever more omnipresent Korean chili powder, and I added some ground thyme. For fat, I added a tablespoon or so of coconut oil.

It is best to vacuum-seal the bag. One, the cooking will take place in a water bath, so one better takes measures to prevent the water from invading your food. Second, the closed bag creates a very humid environment. That, in combination with the low temperature of cooking, will lead to an incredibly moist result.

The unappealing tenderloin after a 2h bath at 140F
My sous vide setup is really basic. I used a food-grade bucket to which I attach the circulator. The bucket needs water, of course, and a pouch with the food. I cover the bucket with plastic wrap to keep evaporation under control. My European background makes me cringe when I think of the energy inefficiency of the setup. One day, I dream, I will find an insulated bucket that will be at least as aesthetically pleasing as my plastic bucket. Given that I am an engineer, my aesthetic standards are not quite at the Steve Jobs level, but I still refuse to use a blue cooler that I bought in a sudden energy-guilt attack.

The tenderloin takes 2-3 hours to bathe at 140F. Many people prefer 135F, which is still high enough to eradicate the bacteria. My mom was visiting, and pink pork is not what she is used to, so I went with 140F. The bath renders a perfectly fine tenderloin lacking any appeal. Seriously, I wonder how sous-vide was even discovered, given how critical appearance is for the food. Would you really believe that a wet chunk of meat has a potential to be delicious?

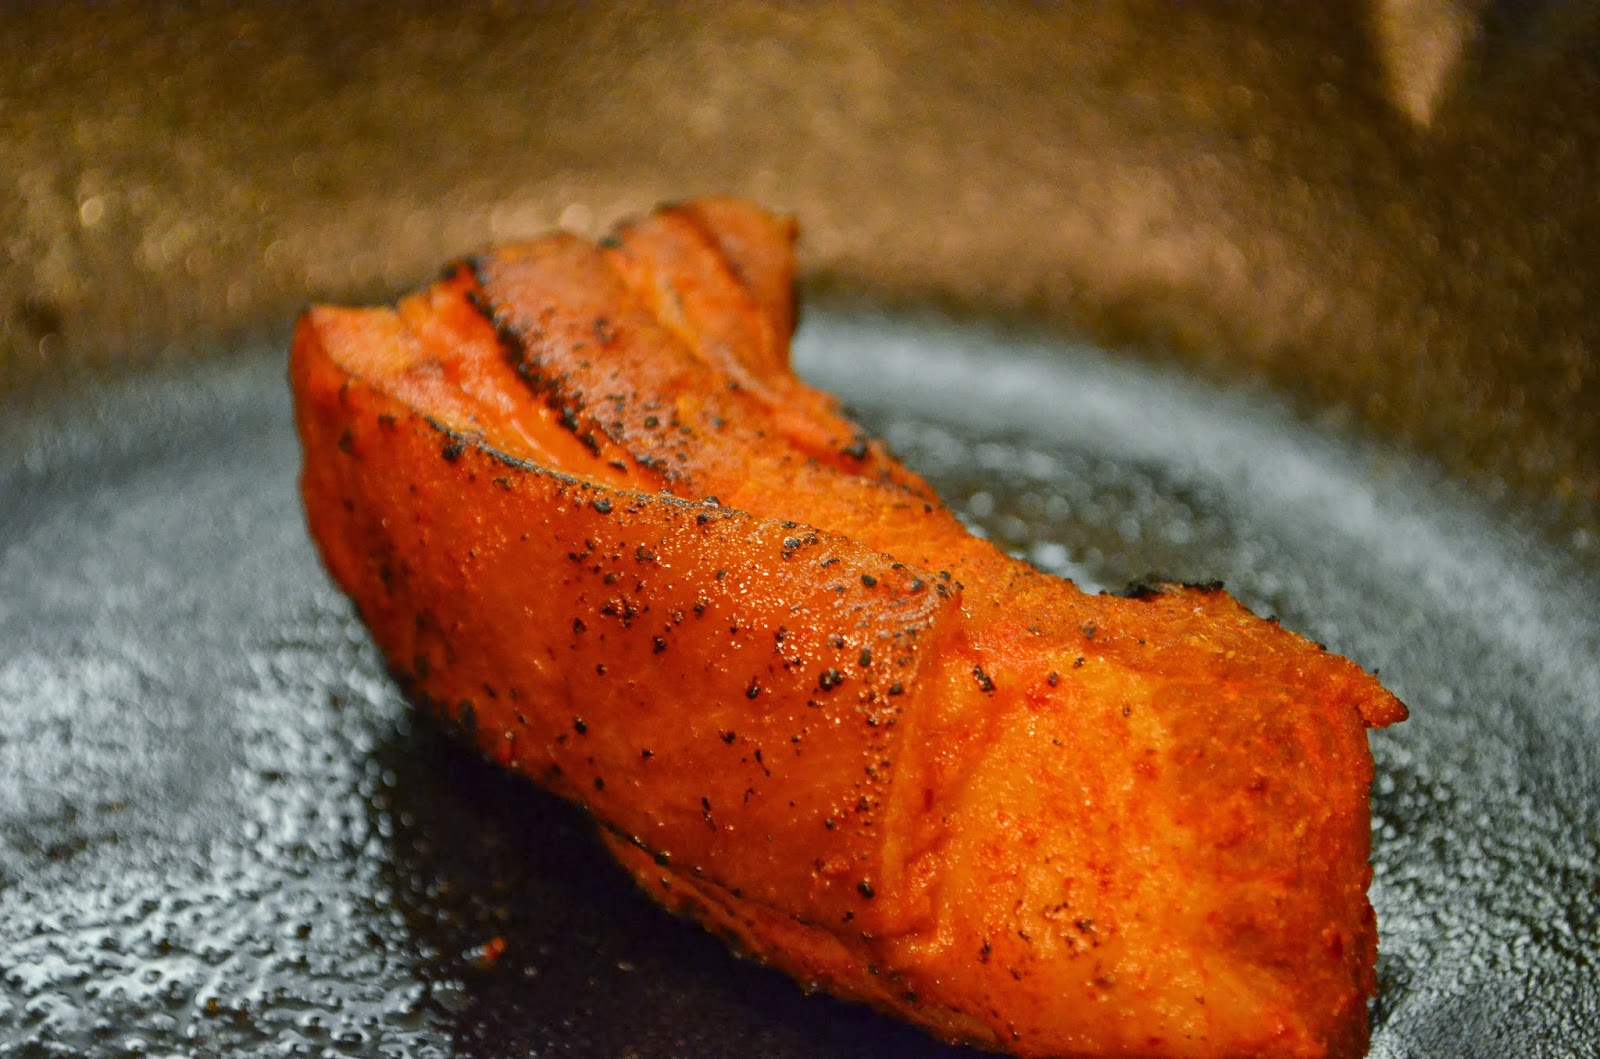
Today we know, that searing the meat is mostly for looks and for the crunchiness of the crust. Searing in the flavors, not so much. And the best searing apparatus is a torch. I love my source of flames. No matter what you do to it, the flame doesn't go out, it is very light, the flame is trivial to regulate, and the fuel is both cheap and easily accessible. Most importantly, the sound of the torch transforms the kitchen into a true cooking adventure.
Torching the tenderloin!!!
I dried the tenderloin with a paper towel to remove as much moisture as I reasonably could. No worries if the meat is not completely dry, the torch will take care of that. The meat goes into a cast-iron pan, which is generally indestructible and help ensure that your kitchen does not end up catching fire. Just be careful that you don't melt away the seasoning on the pan. As long as you point the torch to the food and move it around, all will be good. Use tongs to turn and hold the meat, searing your fingers would make you miss that delicious tenderloin for sure.

You will know when the searing is done. The unappealing slab of meat will yield place to a deliciously looking tenderloin, waiting to be sliced and salivated over.

The torched tenderloin
When you slice the meat it becomes obvious why sous-vide, and why torching. Even the picture below can communicate how juicy the meat is, and how evenly cooked it is. Moreover, look at the very thin rim of overcooked meat around the edge of each slice. This is the result of searing with the torch. If we cooked the tenderloin in a pan, or if we baked it, that rim would extend pretty much to the center of the meat, resulting in unappetizing dryness.


Saturday, March 1, 2014

BBQ-ed dungeness crab

Dungeness crab is readily available in SF Bay area, confirming this is one of the more fortunate places on the planet, not only in terms of technology job opportunities, but also in terms of abundance of top-quality produce.

Here is a trivial way to prepare dungeness crab. No fuss, and a very tasty outcome.

Start with fresh crab. Local Asian stores have them available pretty much all season at somewhat reasonable prices. Our skinny friend Sujeong claims the right quantity is one crab per person, and I will not object. It is wise, though, to have modest plans for consuming much else.


I am very aware of perennial debates about what is the best way to kill the crab to minimize its agony. Some advise to whack it with a bat, some suggest a needle, some say just plunge it in a big pot of boiling water. I suggest you do whatever you think is appropriate. Last time I cooked crab they showed no signs of life by the time the water was boiling, so I was able to bypass the dilemma.

Bring a large pot of salted water to rolling boil, and drop the crab(s) in the water. Let them cook for about 5 minutes max. I use long tongs to extract the crab from the pot, and I let it cool for a few minutes in the kitchen sink so that I can handle the crabs easily with my bare hands. 10 mins or so should suffice.

After that I clean the crab using a technique very similar to what is shown in the video above. I like to cook the crab first to have it retain moisture, but you could clean it first and immediately cook it on the BBQ. Once the crab is clean, you can tear the legs from the body to make further cooking easier. If you wish, you can crack the legs slightly to let any liquid drain out, and to aid with peeling the shell off when you consume the crab. This will result in a different texture of the meat than if you leave the shell intact. I prefer it that way, but the final call is yours.

Toss the crab is a bit of oil to prepare it for the barbecue. I use oil with a high smoking point, such as avocado oil that decomposes at 500F. Frankly, I see no point in using extra virgin olive on the BBQ just to have it decomposed in a second. Place the crab on a medium heat BBQ for about 3-4 minutes per side, lid closed. 

The crab... There was barely any left to make a picture
When the crab is done, put it in a large bowl. Sprinkle the crab with a pinch of salt and a good pinch of korean chili powder. Add a tablespoon or so of coconut oil. For years, we have been using the extra virgin coconut oil from Nutiva

Put the bowl on the table and dig in, use your hands. Refrain from throwing the shells over your shoulders, only Asterix and Obelix are allowed to do that, and only when they devour boars.

If you insist, of course you can use melted butter with garlic or whatever other dip makes you happy. The trick with the coconut oil, korean chili, and salt is that some of it sticks to your fingers when you eat the crab, and adds to the taste of the crab. No need for anything else. 


Saturday, February 15, 2014

Pork Belly, Braised Sous Vide

Pork belly! Back in Slovenia we had no use for uncured bacon. We would cure it, smoke it, bake it, render it. Especially rendered bacon makes very prominent appearances in many Slovenian traditional dishes. All of them, of course, from the peasant times where it was key to consume enough energy. Not so much these days.

But then there is pork belly. Asians have figured out it is one of the tastiest things on the planet. I remember vividly when I had it for the first time, being somewhat suspicious of eating braised bacon. Then I learned that the texture was outright screaming awesomeness.

I have been experimenting with braising pork belly Korean style, and the results have been good enough that I "keep experimenting". When a sous vide circulator joined our kitchen arsenal, pork belly was on the short list of things to try. Let me describe first the sous vide approach, and then mention what to do if you have not splurged for a water oven.

First, you need pork belly. The meatier the better, and around here this means a trip to HanKook, the top Asian market in South Bay. I think I used about 1.5 to 2lb of pork belly. Pork belly likes to bathe in a pool of spices before one cooks it. I used about 2TB dried Korean red pepper powder, and about 2TB of Korean chili paste, about 1 TB or so of garlic powder, a good sprinkling of salt, say 1tsp or so, about 1TB of sesame oil, and about 2 TB of rice vinegar. I mixed the spices in a plastic bag, added pork belly that I cut into three chunks to fit the bag nicer, and then I vacuum-sealed the bag.

Pork belly after 48 hours at 144F
Tip: When vacuum sealing a bag with wet ingredients, I always use the manual mode and pulse the pump carefully. This way I extract most of the air, yet I can make sure the liquid is not sucked out, clogging the pump.

I let the pork belly marinate in the fridge for about a day. At least a few hours is the minimum.

I cooked pork belly in 144F water bath for 48 hours. A couple of hours more or fewer doesn't make any difference, so no need to panic if it is 10pm and you want to eat pork belly in two days for an early supper.

After 48 hours, the pork belly looks kind of odd. It is not obvious it is cooked, yet it is quite clear that it is not raw. I am a bit sad I didn't take a picture of the pouch in which the pork belly was cooked. You could see that a good amount of fat, but not all, got rendered out. Will it be dry?

Torched pork belly looks much more appetizing
To make pork belly look respectable, one either needs to blast it in the oven, or under the broiler, or one needs to attack it with your handy torch. After drying the meat with a paper towel, I reached for the torch. The visual change after torching is always a surprise to me.

I tend to torch things in a cast-iron skillet. It is very unlikely the skillet will catch fire. A wood cutting board is a surprisingly good choice as well.

Once the pork belly looks that good, the only thing one can really do is slice it and consume it promptly. I seasoned the sliced pork belly with a touch of sesame oil, and I served it with a 50:50 mixture of brown rice and black rice, that I cooked slowly in vegetable stock. Then I got adventurous and added a few slices of avocado. The effect was shockingly sublime. The rice had a touch of chewiness to it, the avocado was is usual buttery-yet-somewhat-plain self, and the pork belly had just enough of spiciness to it that it paired beautifully with avocado and rice. I was not sure about the interaction of two very rich and smooth textures, but it turned out that avocado helped the pork belly reach the full potential of melting in your mouth.

As much as I like pork belly, I can only consume a few slices. What should one do with leftovers? I only torched the pork belly that I was about to slice, and the rest found itself in a plastic container in our fridge. When I wanted to consume the rest, I could have re-heated it in a sous-vide bath to 130F, and then I would repeat the pyrotechnic exercise. I was more in a hurry, so simply sliced the meat and reheated it in at a medium heat in a cast-iron pan. As long as you don't overheat it, the deliciousness will stay around.

Pork belly braised in the oven and then crisped in a pan
What to do if one does not have sous vide equipment? Start by marinating the pork the same way as for sous-vide cooking. Before braising, bake the port belly at 350F for 30 minutes, this will firm up the meat a bit.

In the meanwhile prepare the braising liquid. I like to use tomato paste dissolved in a 2-3 cups of water, some red wine, garlic, and the omnipresent Korean red pepper powder, a tablespoon or so. Add a tsp or so of salt. Do taste the liquid to see what it does for you! Optionally you can add some sugar and soy sauce, just make sure you adjust the amount of salt if you use soy sauce. Add the pork to the braising liquid, bring to simmer, and braise in the oven at 325F for 2 hours or until fork tender. Or simply have it simmer on the stove top for 2h or until fork tender.

Before serving, dry the pork belly with a paper towel and either crisp it up in a hot oven, or perform my favorite activity and torch it. I like torching because it crisps the surface, but the heat does not penetrate deep as it does in the oven. You can also crisp the meat in a hot cast-iron pan.

Pork belly cooked the traditional way will melt in your mouth and you will be temporarily transported to taste-bud heaven. Sous vide, however, elevates that to a level I was not aware existed until I gave it a try.


Sunday, February 2, 2014

Coffee, freshly roasted

Summary:

  • Preheat the oven to 215C (420C). 
  • Evenly spread green coffee beans on baking sheet lined with parchment
  • Put the baking sheet in the oven, turn the vent hood on if you have one
  • After 25 minutes, take the coffee from the oven, let it cool
  • Optional: Clean away the chaff - I put it in the colander, rub the beans, and as I toss them I gently blow the chaff away, or I rub it off and blow away directly from the baking sheet.
  • Preferably let the coffee air for about two days before using.
Clearly, my most significant achievement is drinking NO coffee while completing PhD and launching Google Music Store. I still find it hard to believe that was all done without any performance-enhancing substances!

One sunny morning Jasna and I found ourselves eating breakfast at Coffee Shack in Captain Cook area of Hawaii. We were told that Coffee Shack was known for its excellent breakfast and for a spectacular view, and I can confirm that both were true, we went back several times. A waiter comes and asks us whether we would like some coffee. I acted as my usual self, put my nose up, and declared I did not drink coffee, and asked for tea. Jasna tends to be smarter than me, so she asked whether the name Coffee Shack meant that they had good coffee. She did the homework and knew about Kona coffee. I just tagged along.

The waiter smiled and pointed to the steep slope just under the restaurant: "Yes, we have good coffee. It comes from our plantation right here!" Jasna ordered coffee, she barely prevented me from drinking all of it, and that was it. The flavor was strong, yet smooth and not bitter, very pleasantly complex. Quite a difference from the awful bitterness people drank back in Slovenia. We became coffee drinkers, and by the time we returned home, Amazon already delivered a coffee-making apparatus.

It turned out that friendly folks at Coffee Shack are very happy to sell you their coffee beans, and that they even do mail order. We have been loyal customers - we consume very little coffee, so we decided to go with the very best. Recently, our friends Rok and Ying visited, told us about a freshly roasted coffee in a local Ethiopian restaurant called Walia, and how they learned one could buy green coffee beans from Selam Market in Campbell. For quite some time I have been tempted to try to roast coffee, but I never really crossed the threshold of looking for the beans. I went to Selam Market the next day and returned with a large bag of green beans. I expected a lengthy trial and error process, so I thought I better stocked up. 

Green coffee beans spread on the baking sheet
Here is what green coffee beans look like, this is about 5oz. I asked my friend Google to point to instructions for roasting coffee beans and I found quite a lot of pretty consistent information. Pretty much everyone recommends to get a popcorn maker and use that for roasting beans, and some even recommend using a heat gun! Many people describe in detail the transformation of coffee during the roasting process. It all looks very doable, but it does require practice and it all seems to be error prone, even if one purchases a dedicated coffee roaster.

I gave it a try and roasted coffee in my wok on the stove top. Those web sites were not joking, the transformation is really interesting. The coffee about doubles in size, it makes cracking sounds in two places in the process. The amount of smoke generated surprised both me and our fire alarm. Of course, I roasted at too high heat for too long and ended up burning the beans. Oh well. I discarded that batch promptly and tried again, this time being much more careful. This time the result was quite uneven, but the coffee that I brewed from those beans was very good. 

The unevenness and the anticipated lack of consistency made me consider shopping for a popcorn maker, or even a dedicated coffee roaster. Remember, tools are good!!! Argh!!!! ... said Tim the tool man. Then something clicked. Everyone was recommending to roast at a very high temperature, yet some listed average internal coffee temperature for different stages or styles of roasting. So being a researcher and all I thought - all one really needs to do is to bring the internal temperature to what it should be, and my oven very happily heats up to the desired temperature.

Coffee after half and hour at 435F
An experiment started. I set my oven to 435F convection, spread the beans on a baking sheet, and put the sheet in the oven. I did use parchment paper simply because I like to use parchment instead of cleaning the baking sheet. I decided I would roast the beans for about 20 minutes after the oven reached 435F, and in the subsequent experiments I converged to 26 minutes at 442F. I also remembered to turn on the ventilator in the range hood, which proved to be a good move. I was curious what would happen, because Sweet Marias, the Cadillac of sources for green coffee beans, claimed one needed a perforated baking sheet to allow movement of the air, and that roasting in the oven would produce uneven results. But they roasted at 500F for 15-20 minutes. 

Coffee bean chaff, removed
I was surprised with how evenly the coffee was roasted. In the picture you can see how much chaff is attached to coffee beans. So the next task was to remove the chaff. I happen to have two metal colanders, so I transferred the coffee in to one and after it has cooled down enough to handle with hand, I started to stir and rub the beans. And when I got bored with that, I would pour the beans from one colander to another. I read about that in one of the web sites. I suggest one does that over a sink, unless you enjoy your place to be super messy.

Cleaned coffee
I found out that the chaff goes away quite easily, but not completely. Here is what the result looks like. See how some chaff is still in the cracks? I decided the chaff would be filtered away when I was making coffee, so not a second of sleep was lost due to my coffee not looking exactly as clean as the coffee from Coffee Shack.

With some more experimenting I decided that the coffee really does need to degas and that the peak flavor develops in about two days after roasting. Your personal preference will come in play here.

Our excellent retro-grinder
Let me quickly describe how we make coffee: We use a hand-cranked ceramic burr grinder one can get for $35-$45 on Amazon. It takes about a minute to grind two scoops of coffee beans, which is Jasna's and mine combined daily consumption. An electric grinder of equivalent quality would be several hundred dollars, and it would consume tons of our non-existent counter space. So we went old-fashioned, much to a surprise of our guests, who, I am sure, find us a little quirky, yet tend to appreciate the quality of coffee, and the meditative aspect of the brewing process :-)

Ground coffee in the upper chamber
For the brewing, we use a siphon where we replaced the original cloth filter with a glass rod Corey filter one can get on eBay. It is much easier to clean than the cloth filter, and people say that cloth traps some of the coffee oils. Speaking of clean-up, I clean the siphon in about one minute, and I am still puzzled with people complaining it is a lot of effort.

The way the siphon works is very neat. One places the ground coffee in the upper chamber of the siphon with the filter already in place. Then you set the upper chamber in the stand so that you can fill the water in the lower chamber.

I always fill the bottom chamber with boiling water because it takes quite some time for the water to heat up. I read that some people believe pre-boiling the water deprives it of oxygen, which results in inferior coffee. The scientist in me has a difficult time believing such a claim, the water boils one way or another. 

Siphon with the water pushed up
When the water is in the lower chamber one sets the top chamber on top of the bottom chamber, creating an air-tight seal. The whole contraption then goes on the stove burner at a medium heat. As the air in the bottom chamber heats up and expands, it pushes the liquid to the top chamber. At that point it is good to lower the heat a bit. Apparently the siphon keeps the water at exactly the right temperature for coffee brewing, a few degrees under boiling. Moreover, some of the air is pushed from the bottom chamber, and that air creates bubbles that mix the ground coffee with the liquid continuously.

We brew our coffee for 2.5 to 3 minutes. When one removes the contraption from the stove, the air in the bottom chamber starts to cool down. That creates vacuum, which sucks the liquid from the top chamber back down. The glass rod has an uneven surface, which acts as a filter, so no coffee grounds make it to the bottom chamber.
Air bubbling in the top chamber
I learned the hard way that the coffee should not be ground super finely. One time the glass filter clogged up and the force of the vacuum broke the glass in the bottom chamber. Thankfully, a replacement was not hard to find. It took me a while, though, to formulate a guess (or should I say hypothesis) for what happened. 

The resulting coffee tends to be very smooth and clean. I really like it that there are no filters to throw away. Most of all, the whole process is like a lab experiment and I always loved to do those. There are much prettier-looking siphons out there, and one day we will acquire one to appropriately wow ourselves, and our visitors. 

Coffee back in the bottom chamber
One of these days I intend to try pour-over coffee, which some say is the superior way of making coffee. But that will take the time as it seems that one needs to carefully experiment. Maybe coffee is not such a trivial thing after all :-)

Update, March 2022

I continue to roast our coffee and have settled on Sweet Maria's as my source. Ethiopian coffee remains my favorite. With our new oven I adjusted the roasting temperature to 430F (about 220C). I have replaced the syphon with pour over as the preparation method of choice. I use the water at 200F, and the coffee to water ratio of about 1:17 - for a gram of ground coffee I use 17g water. That may sound excessively finicky, but using a scale is quick, helps with consistency and predictability, and it also prevents me from overflowing my cup. The most significant upgrade has likely been the coffee grinder as I switched to 1ZPresso JX with a remarkable difference in grinding speed, uniformity of the grind, and of course coffee flavor.

A much improved coffee grinder

Sweet Maria's was kind enough to include their roasting card in my latest order. Here are the photos - they do demonstrate that coffee roasting is quite easy.


Update Nov 2025

We still roast coffee on our own and we still like it. We moved to Europe and now we have an electric smaller over that runs quite hot. The new roasting temperature is 215C (420F) and I think we might experiment with 210C. The moral remains that with roasting at home one can cater to their own taste and make coffee exactly the way they like it.


Smooth start of the day

Recently a friend asked me what blender she should get and mentioned that VitaMix seemed popular, yet it was somewhat extravagant. That matched precisely how I felt several years ago when our blender decided it had made its last smoothie. In our quest to find a replacement, we purchased three or so different blenders, climbing up the price range ladder, and returned them all. The worst was a fatal engineering flaw causing the bottom of the jar to unlock at the worst possible moment. Too bad that I didn't take a picture of strawberry smoothie decorating our kitchen counter and our kitchen floor. Another one had blades so dull that the smoothies came out stringy.

At that point we reached a moment when nothing but extravagance was an option. I ordered a commercial version of VitaMix over Ebay. The reason I went with the commercial option was that it supposedly had better sound proofing, and a more powerful motor.


I am sure you are wondering why ear muffs appear in the picture! I opened up the blender and looked hard for any evidence of sound proofing, and I am yet to find any. My experience with friend's VitaMix tells me that the same appears to be the case for home-use models, or at least it was a few years ago. Jasna rightfully demanded ear muffs to be used when the blender operates at a high speed, and I acknowledge she was right. Besides, how cool is it to have kitchen equipment so powerful one must wear ear muffs! If I was Tim the tool man, I sure would have produced a very respectable grunt. I don't believe the urge for ear muffs is unique to VitaMix, any powerful blender will be loud.

I must say that I became a firm believer in using a high-power blender such as VitaMix. The smoothness of the smoothies and creaminess of soups without cream is just unbelievable. The motor appears to be built to last for a long time. Not all is perfect though. We had to purchase a new jar, because the seal on the original jar went, and the blade assembly cost the same as the whole jar. Recently I had to replace the potentiometer that regulates the blending speed. Very easy to do yourself if you are not afraid of a soldering iron. Otherwise, the $10 DYI repair apparently costs $150 if done by the friendly and certainly well qualified VitaMix technicians. Given that my blender is out of warranty, I opted to face the soldering iron. Which I hadn't had a chance to use since we moved from Slovenia. Imagine another grunt by Tim the tool man.

So let us make a smoothie! I categorize the ingredients into three categories, fresh fruit and vegetables, liquid, and add-ons. Proportions and quantities are somewhat arbitrary. The last thing one needs in the morning is to break out a scale and weigh kale by the gram. This is what I used this morning:

Fruits and vegetables: About 1/3 bunch of kale, a handful of fresh pineapple cubes, one small cored apple, one small cored pear, one banana.

Liquids: Orange juice, about one cup, and juice of one lemon.

Add-ons: A couple of tablespoons of almonds, 2 tablespoons of soaked chia seeds, a tablespoon of coconut oil, a good sprinkling of cinnamon, a tablespoon of oat bran.

I start the blender at a slow speed and then increase the speed just enough to incorporate and chop all the ingredients, then I increase the speed gradually, all the way to the turbo mode. I let the blender run at the top speed until I can't see any specks of kale or other ingredients, probably about a minute. The result is a bright green smoothie with a nicely balanced flavor. 

Green goodness
The key is the lemon juice which brightens up the flavor and balances out the somewhat dull taste of raw kale. Note that I added some sweet ingredients, namely the orange juice, the apple, the banana, and also the pineapple. Those, too, round up the flavor rather nicely. One can, of course adjust the ingredients in any arbitrary way and cut down on sugar. For example, water works just fine instead of orange juice. I like a lot the combination of orange juice and pineapple, like in pin colada, that is why I used both. Jasna tells me that she learned from the nutrition class at Stanford that the morning is the time when one needs to get some carbohydrates, so the smoothie serves that function for us.

The yield is more than one can and should drink at breakfast. Jasna and I each drink about a cup each, the rest goes in the fridge and we use it as a very tasty snack. Note that this smoothie is loaded with fiber from kale, almonds, chia, pear, and oat bran, and that it also has a bit of protein, so it is almost a complete meal.

Note: After reading the blog, Jasna corrected me. Half of the calories from the fruit come from fructose, and what the lecture was referring to was glucose. We continue to consume the smoothies.

Note that you can throw your vitamin pills in the blender along with other ingredients. This is a good trick especially if you have a problem swallowing.


Monday, January 27, 2014

Hazelnut hot chocolate, adult version

Monique's in Palo Alto makes wonderful truffles. The dark chocolate bites induce a ridiculous degree of pleasure. However, my favorite indulgence at Monique's is their hot chocolate. You pick the chocolate, you pick the liquid and flavorings, and they do the magic to combine the ingredients into a memorable experience. While I prefer, by far, very dark chocolate truffles, when it comes to hot chocolate I am all about milky. My favorite is hazelnut flavored chocolate with hazelnut hot milk.

I challenged myself to come close to Monique's level. Today I gave it a shot, and according to Jasna, Monique's now has a rival. I personally think I found a fabulous excuse to experiment and make much more hot chocolate, yet I don't entirely disagree with Jasna's assessment.

Note that this is a pretty adult version of hot chocolate. It is not very sweet, the combination of hazelnuts and chocolate makes it pretty thick. I am sipping it as I type this ...


First, I had to make hazelnut milk. The ingredients are simple, roasted hazelnuts and milk. I added a fistful or so of hazelnuts and a good cup of milk to the blender. I started blending at the lowest speed to chop the hazelnuts, then I gradually increased the speed to the max, and finally it was turbo-speed time. I let the blender run at its top speed until the milk and hazelnuts became quite hot, but not boiling. I did not time the blending action, but I am sure it was at least 5 minutes. The result was a frothy and thick liquid with hazelnuts completely emulsified. This is where Vitamix truly shines and this is how one justifies the expensive purchase!

While the blender was running, I put a stainless steel pan, 2.5 quarts, on the stove at a very low heat and I put in one row of milk chocolate, and half a row of medium dark chocolate, both the Belgian variety from Trader Joe's. The heat was low enough to slowly melt the chocolate, but did not scorch it. Then I added the hazelnut milk, increased the heat to medium and stirred with a spatula for a few minutes. The chocolate was completely dissolved in milk, there was no trace of chocolate chunks or particles. I added a teaspoon of vanilla extract and about a teaspoon of hazelnut extract. That is because I am nuts for hazelnuts.

I made sure the hot chocolate did not come to the boil, both to prevent scorching, and also to retain the frothiness.

Addendum, March 22, 2014: Lately I have been using milk frother to "whisk" the hot chocolate after stirring it well with a spatula. The additional airiness is a substantial improvement over the previous iteration. I also discovered that chilled hot chocolate, meaning straight from the fridge, is addictive.

Addendum, February 27, 2018: This hot chocolate remains our favorite. I adjusted a little bit how I make it, hence this update:

  • I still blend the hazelnuts and milk until I get a total emulsion. No chunks. I am pretty sure one needs a powerful blender like a Vitamix. I blend until the liquid is pretty hot.
  • I still melt my chocolate on the stove, though one could also use the microwave. I started to use dark chocolate only, 72% cocoa if I have it.
  • Now I add melted chocolate into the hot milk-hazlenut emulsion in the blender and blend some more. This emulsifies the chocolate really well.
  • I add some hazelnut extract, and some vanilla extract to the blender along with the chocolate.
  • I tend to finish the heating the mixture up on the stove, though one could also pour the hot chocolate into cups and put them into a microwave for a few seconds.